I went to a shop called Latif's (UK store) which sell discounted items, I noticed that their artificial flowers were actually very life-like and quite special. I thought, "I could totally try and make my own bridal bouquet with these", which sounded a lot simpler at the time to what the actual reality of making this bouquet was.
I have never in my life participated in flower-arranging, I have absolutely no experience whatsoever and this realisation hit me when I got home with £30 worth of artificial flowers. I consulted youtube and google for the techniques and made mental notes of the style that I wanted. I absolutely love the cascading waterfall effect bouquet so decided to make one like this. If you are just starting out, it is probably the hardest one to try first. Not that this stopped me!
I visited my local flower shop and the lady in there was so helpful, she advised me on how to 'stem' the flowers, how to arrange them, how to keep them in place and how to utilise the mass amounts of wire that is used to keep them all in place. Her advice was incredible to be honest and she did me a brilliant deal for a cascading bouquet holder, two bridesmaids and all of the wire that is required.
First thing first is to get all of the tools and bits you will need to make one.
Here is a list, with images, of the essentials, I got most of these bits from my local florists but I am sure eBay would be able to help;
1. Bouquet holder (at an angle for the cascading/waterfall effect):
You must use foam that is specifically for artificial flowers, as foam for real flowers will not hold them.
2. Florist Wire - this is actually essential to keeping the flowers in place, there is more tying wire involved than you would think!

3. Glue (Bostok all-purpose does the job) - this is very useful for sticking the flower heads to the stems as artificial flowers tend to have loose flower heads, it is also useful for sticking the stems into the foam to secure them into place.

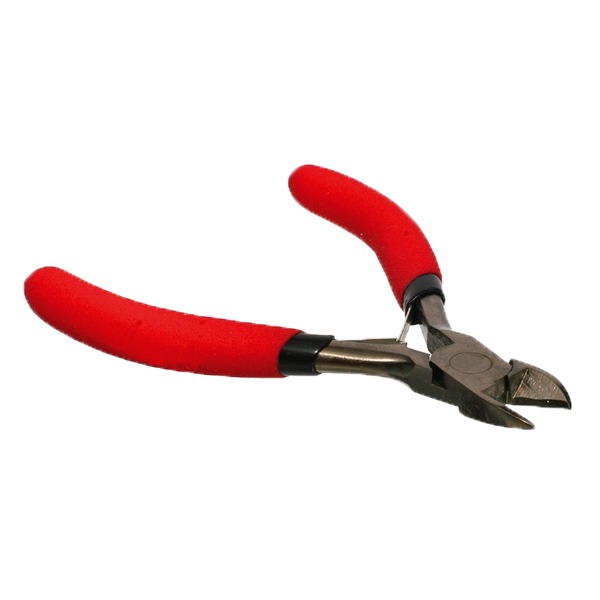
4. Wire clippers and scissors are an essential purchase for cutting the stems to the correct length;
5. Stemtex for 'stemming' and wiring the stems;
6. And of course, a good selection of flowers. You should try and get flower heads of all different styles, sizes and shapes. The closed flowers (like closed rose buds) are good for the sides and the bottom of the bouquet as they look quite effective when they are upside-down. For the middle of the bouquet I would suggest larger, fuller flowers.
The shape you are looking to achieve for a waterfall/cascading bouquet is an upside-down tear drop, much like this (but imagine it rotated 180 degrees (upside down);
 |
| This is what £30 worth of flowers look like (from Latif's) |
The shape you are looking to achieve for a waterfall/cascading bouquet is an upside-down tear drop, much like this (but imagine it rotated 180 degrees (upside down);
The best advice I can give is to imagine what you want it to look like, try arranging them beforehand to ascertain what style you prefer and which colours and flowers work well together.
You also need to check that the height of each stem is correct, you do not want an uneven finish of the flowers with bits sticking out at all angles, it will just look messy. The stems of the bottom and side flowers will obviously need to be kept longer than the ones in the middle as they have further to hang.
Now down to the technique:
I started from the bottom sides and worked my way from the bottom upwards. This maintains the shape of the bouquet and gives you an idea of what shape the overall bouquet will be in the end.
Measure the stem height against the bouquet to ensure that it is the correct length that you require.
Once you have the correct length of the stem it is time to start wiring and stemming the flower. I found a blog with images of someone doing this here, as I didn't think to take photos of me doing the stems (the website is in foreign, but it helps from a visual perspective). Each time, check whether the flower head is stuck to the stem properly. You can do this one of two ways, by trying to gently tug at the flower head to ensure sturdiness; or by doing it my favourite way which is swinging it around your head :O). If it is not going to come off doing the latter, then I think you should be fine. If however, it does fall off, then gluing it into place onto the stem with the Bostok glue will do the trick. Be careful with this glue as it is extremely stringy and tends to come out of the tube of its own accord, so only a tiny squeeze of the tube is necessary. It has a mind of its own!
Keep the length of the florist wire the same height at all times, this is the only wire you do not usually need to cut. It only matters what the length of the stem of the flower is and this needs to be cut accordingly. You will need to use the florist wire to tie it onto the bouquet so the more the better and you will not see this wire once all of the flowers are in place. As you are starting from the bottom sides I did not need to cut the stems of many of the flowers that I used at this point as I wanted to keep the length to ensure they were long enough for the waterfall/cascade effect.
Using the stemtex tape, get one piece of florist wire and put this against the stem vertically. The idea is to bond the wire, stemtex and stem together so that it looks like a 'natural' stem. Do not twist the wire around the stem, otherwise when you stem it with the stemtex tape it will have a weird twist effect which looks a little bit pants. I know some florists advise to do this with real flowers, but it does not have the desired effect I wanted. I found doing it the way I advise below is the best way to ensure it looks the part and it is sturdy.
 |
| I used a large piece of a sturdy branch to make the base, so that when the bouquet was held the flowers would rest against them and keep the shape. As you can see from the picture, lots of wiring and tying is involved. |
I find starting off a stem is the hardest part. You need quite warm hands to make the stemtex tacky, you will notice that the tape is quite stretchy, but stretch it too much and it will break. It is a bit of a balancing act to try and get this part right, so I would suggest trying it first on a flower that you do not want to use for your bouquet.
Use the warmth of your fingers to make the stemtex tape tacky, hold it at a slight angle (going in a downward spiral), holding the wire against the stem vertically, use the tape to gently pull and tug the stemtex down the flower, making sure to stretch it slightly as you go using your thumb and forefinger, the tackier the tape, the better as it will stick better.
It takes a bit of getting used to, but once you get the hang of it, it will only take 5 minutes or so to do one stem each time (depending on the length and ability). The stem should look like it almost doesn't have a wire on it. You will find that often the length of the wire is longer than the stem (not so much with the side or bottom flowers, but certainly the middle flowers). Once you reach the bottom of the stem of the flower, keep going with the stemtex tape and cover the entire of the florist wire with the stemtex tape. Every flower needs to be wired and covered in stemtex, there is no cutting corners. This is to ensure the flowers are pliable, bendable and able to tie onto the bouquet. It also keeps the colours of each stem the same so that the whole bouquet looks coordinated.
.jpg) |
| Starting my bouquet, starting from the bottom sides. Excuse the mess on the table... |
 |
| Check that the length of the bouquet is to the length you want - too long and it will overshadow your dress and you! |

Use the wire to tie it on to the bouquet holder, as you can see the bouquet holder has little plastic wires itself to hold the foam to the holder, use these to your advantage as much as possible. You want to leave enough room in the middle of the foam for sticking in the larger, fuller flowers, so I suggest utilising the sides and bottom of the bouquet holder as much as possible in the early stages.
Here was the finished article :


.jpg)


It is not completely finished yet, I still need to finish the handle, but it is nearly there! If you have been making your own bouquet and want to share yours with me then please comment below, or comment and let me know what you think :)
For the bridesmaids bouquets I must admit, I cut corners. I decided to not use a bouquet holder this time and decided to hand-tie the flowers to each other using wire to see what they would turn out like, they turned out quite well actually!
Here is the finished result of them:
.jpg)
.jpg)

.jpg)
.jpg)


Here was the finished article :
I say 'was' because although the above photographs are the right colours for the wedding, I wanted my bouquet to be slightly softer with pinks as the girls will be in burgundy and I thought the above, although is nice, ended up slightly too formal for what I was after. I wanted my bouquet to seem more wild and whimsical. So I actually ended up taking most of the burgundy and red flowers out and replaced them with softer, paler pinks. Because most of the flowers were wired in rather than glued, this helped a lot with taking them off the bouquet!
Now here is the actual 'nearly' finished result:
For the bridesmaids bouquets I must admit, I cut corners. I decided to not use a bouquet holder this time and decided to hand-tie the flowers to each other using wire to see what they would turn out like, they turned out quite well actually!
Here is the finished result of them:
For the bridesmaid bouquets, I ensured that each flower was stuck in by using bostok glue and literally used wire on a coil to bind them together, I then used double sided stick foam on a reel and covered the wire by going downward in a spiral from the top of the flowers down to the end of the stems. I then covered the double sided sticky foam with double-sided tape and wrapped the pink ribbon as shown above. The double-sided sticky tape actually works very well with the ribbon and has bonded nicely.
I've worked out that I have probably spent about £55 altogether on the above, but I also have enough flowers to do 13 buttonholes, I was quoted for fresh flowers in the region of £400-900 for the equivalent of what I have made AND I get to keep them forever :)
I'm going to have a go at making a buttonholes post, so watch this space!
Here is a video I used on youtube to get me started, hopefully it helps/inspires you too (bear in mind, these are real flowers used! Therefore the foam is a lot softer and easier to pierce):
This was how they looked on the wedding day: